We used these survey instructions during our 2018-2022 data collection. This page has been archived for the historical record.
Breeding bird atlases typically differentiate between two types of data submission: targeted block visits and incidental observations. Most atlas data will come from targeted visits to a block. These can be visits to a block that you have taken on as the block leader, or they can be visits to some other area where you happen to go birding. Incidental observations are generally those obtained while doing something else – driving to work, working in your garden, etc. It is important to know, however, that anyone can submit data from anywhere in the state, via either means. This page describes how to record and submit data obtained during a targeted block visit. For information on incidental observations go here.
If you are visiting a block with the primary goal of surveying for the atlas, your first decision is whether to use eBird or not. No one is required to submit information via eBird, but if you are an eBird user, then we recommend that you use this method both because it reduces the amount of data entry we have to do, and because it will allow you to combine information from your atlas surveys with your other birding checklists. If you are not an eBird user, then we have provided a field card that you can print off and fill out while in the field. You can mail the field cards to us, or scan them and send via email. Details of all the project’s data forms, and when to use each, can be found here.
Whether you use the field card or eBird, we ask that you submit a separate checklist for each time you visit a block. Separate checklists for each visit give us much better information on the timing of breeding in different species and on how timing varies across the state.
Submitting data via the field card
Completing the field card is fairly straightforward and has two parts. First, there is some basic information about the birding trip to fill out at the top of the card:
- the names of all the observers in your party, so that we know how many people were in the group,
- your email address so that we can follow up with any questions,
- the block ID,
- the date of your visit (please start a new checklist for every visit),
- the times you start and end birding,
- if you are just visiting one specific site within the block then also put the name, along with coordinates (latitude and longitude in decimal degrees) so that we can locate the site (more detail on locating specific sites is given below),
- whether you are submitting a complete checklist that includes every potentially breeding species that you detected.
For each species, write in the breeding code associated with the strongest evidence of nesting that you detected during the visit. Codes are printed on the field card with brief explanations and those farther down the list indicate stronger evidence, such that NY (nest with young) is the strongest, while X (heard or seen with no evidence for breeding) is the weakest.
What species to include: We would prefer that you note every species detected during your visit that is a potential breeder in the block, using code X for any species that none of the other codes apply to. If you do this, circle the word “YES” near the top of form; if you do not submit a complete checklist, please circle the word “NO”.
If you see species that are not listed on the field card, it is probably because they are migrants that do not breed in the state. These species do not need to be included for the checklist to be considered complete. If you find evidence for breeding in a species that is not listed on the field card, then add that in the blank space at the end of the checklist. Please also submit a rare records form to provide additional details for breeding records of any species that is not on the checklist or that has an * against its name.
Separating data from different sites within a block: Most atlases just collect a single list of species for each block, without differentiating among sites. Doing this keeps things simple, but means that the data have fairly coarse resolution. To improve the quality of our data collection, we encourage birders to identify separate locations within their block and to submit separate checklists for each site. Doing this is especially valuable if a site is a land trust property, state or town park, or other piece of open space. If you provide coordinates for each site (instructions to do that are given under the Option 1 heading, here), along with the site name, then we will be able to enter it as a distinct location within our database. Doing this will also make it easier for us to generate checklists for individual properties, which is something that many land trusts and town conservation commissions are interested in having. If you feel that maintaining multiple field cards is too much work, however, it is fine to submit just one for an entire day’s birding even if it includes multiple locations within the same block.
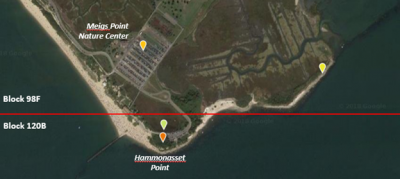
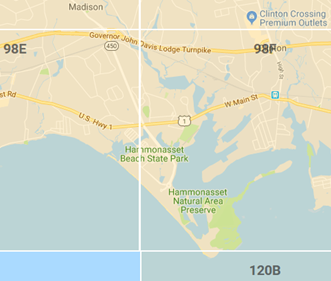
A word of warning: The one potential pitfall with submitting data linked to specific sites arises when a site straddles the boundary between blocks. When that happens, it is important to record birds seen on each side of the boundary on separate field cards, so that they can be assigned to the correct block. Hammonasset State Park, for example, spans three different blocks (see map below). Most of the park is in block 98F, but the marsh at the far west end is in block 98E and the point at the start of the moraine trail (including half of Rock Pond) is in block 120B. Records for these other blocks should be separated from those for 98F.
Submitting data via eBird
If you are an eBird user, then submitting data is simpler in several ways and makes it much easier for us to get data directly into the atlas database. There are, however, a couple of pitfalls to watch for.
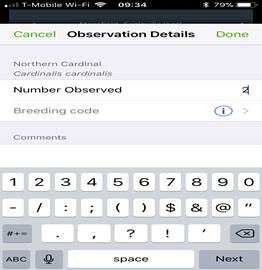
If you use eBird, simply create a checklist as you would normally, but provide a breeding code for any species for which you obtain breeding evidence. Including breeding codes is essential – only records with breeding codes will contribute to the atlas database. To add codes in the eBird app touch the name of the species you want to enter data for, then touch the line that says “Breeding code” (see screen capture, below) and you will be given a list of codes to choose from.
If you enter data from the eBird web site, click the “Add Details” button after adding a species:
![]()
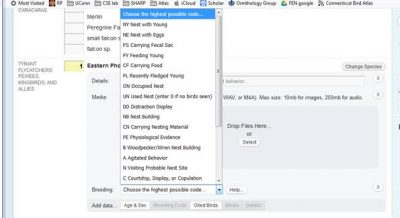
Then, click the “Breeding Code” button at the bottom of the pop-up window that opens below the species’ name. When you do this, a field will appear just above the button saying “Choose the highest possible code…”. If you click on the down-pointing arrow at the right end of this box, you will be given a list of breeding codes to choose from:
If you have additional notes related to your observation, especially if it lies outside the safe dates for the species, then please add them to the comments box as shown below:

Once you have completed your checklist, please share it with the atlas eBird account (ctbirdatlas) to ensure that we get the information immediately. You can do this by going to the checklist in your eBird account and clicking the “Share w/Others in your Party” link, which is near the top on the right. Then enter “ctbirdatlas” in the box at the top and click on the “Share Checklist” button. For more information on checklist sharing, click here.
We will review the checklist, email you if we have any questions, and add the information to our database.
Locations for eBird checklists: As described above, your data will be most valuable if they are linked to a specific, relatively small, location. Creating personal eBird locations for each site that you go birding within your block would be the ideal. You can also use existing eBird hotspots locations, but be careful with these, because sometimes the area associated with a hotspot will straddle multiple blocks. For example, Horsebarn Hill on the UConn campus in Storrs is split between two blocks, but the hotspot location is in Block 40D (see map below). That hotspot should not, therefore be used for sightings seen on the east side of the hill or in Valentine’s Meadow, which is to the southeast and has its own hotspot.
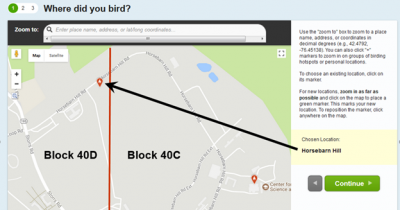
Large sites, like Hammonasset State Park, often have a single overarching hotspot for the entire area, and multiple additional hotspots for specific locations. Using the specific locations is best, but, if you do not want to maintain lots of separate checklists, you do not have to, as long as all of the atlas records on the checklist are from the block that contains the hotspot marker.
At Hammonasset, for example, you might want to create a personal hotspot for the small part of the park that lies in block 98E at the far west end because there is no hotspot marker in that area. Sightings from block 120B are best entered using the hotspots by the parking area at the start of the Moraine Trail (just above the words Hammonasset Point in the picture below). All other hotspots in the park will place records in block 98F. Similar hotspot issues apply to larger birding sites throughout the state, so check the block boundaries on the block map here or download the block boundary map to Google Earth (available on the block map page) so that you can look them up on your phone.
